Thursday, October 29, 2009

We Have a Winner!

Thank you so much to everyone who entered the Michael's card giveaway! I was thrilled with the turnout we had around here.  And I had a great time perusing many blogs of those who entered.


Thanks to random.org, we have a winner!

Congratulations to Krista! Have fun shopping!

Thanks again to everyone who entered. 
I hope you will all stick around and see what I have going on here on a regular basis!

PS Thanks for all the great Halloween candy suggestions too!

Tuesday, October 27, 2009

Tablescape Envy

I had to share this fabulous tablescape with  you.  This is from a design blog I read, coco+kelley.
One of my favorite features on the blog are the original tablescapes.  


I love this Bohemian fall design.  The designer behind coco+kelley is Cassandra.  Her styles are always sophisticated, and she has a great eye for detail.  I especially like the way she incorporates a metallic shade in her tabletop designs, which are often inspired by fashion.


Pop on over if you haven't seen this post already.  There's a giveaway going on also!

Monday, October 26, 2009

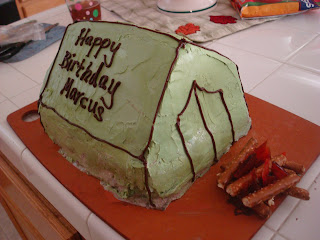
Cake: Tent & Campfire

I'm taking a little break from Halloween over here, in order to share my latest cake-baking adventure.

I made this cake for my nephew's birthday. He is a boy scout, and LOVES to camp.  And he was very specific in his request: a cookies and cream icecream cake. 


I never would've guessed that it would be 80 degrees at the end of October.  The warm weather made it difficult to keep the ice cream from melting.  You can see it seeping out the bottom a little in the picture.

But it was tasty, and the "campfire" was adorable.  :) I used a little pile of frosting to hold it all in place, and then piled pretzels for logs.  The flames were made by melting crushed lifesavers in the over, cooling them in the fridge, and the breaking it into fiery-looking shards.

To make the cake, I baked two 8 inch square cakes.  The peaked top was made by cutting the cake as shown here:  (if you're looking at it from the front)

All 6 triangles were stuck together with lots of frosting to make the peaked roof.
The cake that served as the bottom layer was cut a little to match the size of the roof. 


Wouldn't this design make a cute house cake for a housewarming party? I can just picture it!


Happy Birthday Marcus! 


You've got two more days to enter my Michael's Giveaway! Hurry Hurry!


Thursday, October 22, 2009

I am Loving: Booed!


You must head over the TomKat Studio today! I have never heard of this, but I love it! And from reading the comments over at Kim's blog, this is a pretty common tradition.
It's a Halloween version of the May Day tradition of leaving flowers for your neighbors and running. (Both are nice, neighborly ways of "doorbell ditch"-ing.)
TomKat Studio has a free printable sign and instructions to get you going in your own neighborhood.

Have fun!

P.S. There's still a few more days to enter the Michael's gift card giveaway! Remember to enter 3 times if you haven't already!

Monday, October 19, 2009

DIY Idea: Halloween Frames

I fell in love with some adorable Halloween frames in a little boutique while I was on my girls' weekend.  Unfortunately, they were expensive.  So, I tried to recreate them this weekend.


I printed the words onto card stock, and attached them to some Halloween-y fabric remnants with a few small pieces of double sided tape.


Then I sewed them on with black thread, set in a zig-zag stitch. 


I taped the fabric around a thin piece of cardboard cut to fit the frames.


A cute little Halloween greeting.

You can download the file with the words I used to make these.  I love this font for Halloween, so I thought I'd share it with you:


Click here to download the file:
Boo

This project was so cheap! 1 sheet of cardstock, a few fabric remnants, 3 cheap frames are all you really  need.

Guess where you can probably get some great cheap frames?  Michael's! Luckily I have a giveaway going on right now! Check it out and enter before time runs out!

Michael's Giveaway!

It's giveaway time!
I have a $30 gift card for Michael's.  Could there be a more perfect time to hit up Michael's?  The Halloween and fall decorations are just about to go on sale.  And the time for holiday decorations is almost here!  And its always a good time to restock crafting or baking supplies.


There are a few ways to enter (each person can enter up to 3 times):

1. Comment here: Tell us what your favorite Halloween candy is!
2. Become a follower of this blog and comment to tell me!  (if you are already a follower, just tell me that in your comment)
3. Post a link to this giveaway on your own blog and comment with a link

You can enter until midnight on October 28th.  I'll announce the winner on October 29th. You should receive your prize just in time for the after Halloween sales!

Good Luck Readers!


Thursday, October 15, 2009

Cake: Fall Leaves

I just returned from the most fabulous Girls' Weekend.  It was perfect.


We talked.


We explored Portland, Oregon.


We visited numerous cupcake shops.


We cooked.

It was fabulous.

I've gotten off track though. The reason for this post is that I wanted to share the cake I made for Girls' Weekend '09.  I have a large number of friends with fall birthdays, so I made a birthday cake for everyone. 


Isn't it cute?


 Yummy border.


 The decorating was pretty time consuming, so I used a box cake mix to save time.  I substituted canned pumpkin for the oil, to make it a little more "fall".  Don't worry, it didn't taste too healthy. :) 

 
 Ahhh...I miss them already. 


Wednesday, October 14, 2009

I am Loving: Nature Inspired Fall Decorations

I was in a Pottery Barn recently and was drooling over some of their fall displays.

I love how many natural elements they've included this year.

Acorns


Pumpkins and gourds


Fall leaves


Wheat and dried fruit

Beautiful, huh?

Unfortunately I don't have the same budget as I imagine the Pottery Barn designers do.  But, I did my best to recreate some of these looks and bring a little of nature's fall bounty into my home this year.

Luckily, the floral department at my local grocery store was selling little gourds, mini pumpkins, and dried wheat.  I picked up a few while shopping today, and used some items I already owned to decorate.


My entry table (home of our never-ending mail pile):  I added some wheat stalks in a fall-appropriate pitcher, and scattered gourds and fall leaves around.


On top of my china hutch:  I gathered these acorns when visiting my brother and sister-in-law's in the mountains a few years ago (free!-the best kind of decoration). I just added some colorful leaves. 


My dining room table:  This wicker cake stand was a gift.  I added a candle, leaves, and little gourds to dress it up. 

Happy Decorating! 


Tuesday, October 6, 2009

Real Party: Bakin' Bachelorette

I have to tell you about a fun party I attended recently. 
Bride-to-be Lisa loves to cook.  So, when it was time to plan a celebration for her upcoming nuptials, her girls had the perfect activity in mind.
The night started with a private baking class. 
This culinary-genius-of-a-man teaches numerous classes in San Francisco. He did a private party for Lisa and her friends, where they learned how to make tarts.

Class description from the website:
Precious Tarts and Pastries
Beautiful European style pastries await you. Students will learn to make delicate, crisp and lightly sweetened tart dough and techniques to roll out perfectly even pastry to fill individual tart shells. Together we will make fruit tartlets filled with fresh vanilla pastry cream, glazed to give shine and garnished with shaved white chocolate.
Check out all the classes offered here
 
We had a light dinner to start the evening, and Sangria cocktails. 

Of course, I made a banner for the occasion! 
 
Remember, custom banners are available in my etsy shop!

 
We learned how to make tart dough (which was delicious- look at all that butter!), and vanilla pastry cream.
 
Then came the decorations...

Aren't they beautiful!?
 
Here's a couple tips and tricks for tarts that I learned:
1.  The key is to roll dough out very thin.  Use 1/8 inch thick flat sticks on either side of the dough, and roll until the rolling pin is flat on the sticks. 
2. Melt jam in the microwave and apply with a pastry brush to make fruit toppings shine.
3. Chocolate shavings over fruit make a perfect topper for tarts.   Hold a chocolate bar with a kitchen towel (to avoid melting the chocolate) and shave with a standard vegetable peeler.  If the chocolate is just slightly warm, the shavings with be longer and more curled. Cooler chocolate will result is shorter and straighter shavings. 
4.  If you are making a tray of tarts to serve at an event, decorate them all the same.  A variety of designs will look childish at a classy event. 
 
The bride-to-be had a fabulous time. 
Here she is, piping the tart cream into the little flaky shells.

 
As any good bachelorette party should: the night ended with a little dancing, and a lot of attention for the bride-to-be.

Even if there is not a similar baking class available in your area, this bachelorette party can serve as inspiration.  Getting the girls together for any kind of baking adventure before hitting the town is a fun addition to the standard bachelorette traditions. 

Congratulations Lisa! 


Monday, October 5, 2009

My Iron Cupcake Entry: Acorn Squash Spice with Hazelnut Buttercream

This month's Iron Cupcake called for squash.   (See my post from last month for details on this event.)
I was quite happy with how my entry turned out.  An added bonus is that they are a little healthier than a standard cupcakes.  I decided to use an acorn squash.  Perfect for any fall gathering...


Acorn Squash Spice Cupcakes with Hazelnut Buttercream

Acorn Squash Spice Cupcakes:
1 cup whole wheat flour
1 1/2 cups all purpose flour
1 cup sugar
2 tsp baking powder
2 tsp cinnamon
1/2 tsp nutmeg
1/4 tsp salt
2 eggs
1 cup whole milk
1/2 cup vegetable oil
1 cup acorn squash puree
1 1/2 cups chocolate chips

Preheat oven to 375 degrees. 


Started making the acorn squash puree.  Cut the squash in half, spoon out all the seeds, and microwave it with about an inch of water.  I checked it every couple minutes, and stopped when it was soft.  Scoop the squahs into the food processor and and puree until smooth. 


Combine flours, sugar, baking powder, cinnamon, nutmeg, and salt.  Stir to combine.


In a second bowl, combine eggs, milk, and oil.  Whisk to combine. 

Combine wet and dry ingredients and mix together. 


Add acorn squash puree and stir to combine.  Before baking, I added about 1 1/2 cups chocolate chips. 


Fill cupcake papers 2/3 full.  For mini's I baked for 12 minutes. 


Hazelnut Buttercream Frosting:  (based on the recipe here)
2/3 cup butter
4 tbsp Frangelico
6 cups powdered sugar
4 tbsp half and half

Cream butter with an electric mixer.
Add Frangelico. 
Alternately add sifted powdered sugar and half and half, and mix until smooth.   I had a little extra!

Here they are!

I topped them with shavings of German Chocolate, which I made with a standard vegetable peeler. 

You've got to try these!